How to Clean a Fuel Tank and Prevent Engine Damage
Cleaning your fuel tank is an important part of vehicle maintenance. Whether you're working on a car, motorcycle, or even a small engine, keeping your fuel tank clean can prevent engine problems, extend the life of your vehicle, and help it run more smoothly. Over time, fuel tanks can gather dirt, rust, debris, and water, leading to clogged fuel lines, damaged fuel pumps, and engine misfires. In this guide, we’ll walk you through the process of cleaning your fuel tank, share essential safety tips, and highlight some details that are often overlooked in other guides.
Why Cleaning a Fuel Tank Is Important
A clean fuel tank does more than just keep things looking neat—it plays a key role in your engine’s health. Contaminants inside the tank can block fuel lines, clog injectors, and cause rust and corrosion within the system. If rust particles make their way through the fuel system, they can damage your fuel pump, carburetor, or injectors, which ultimately leads to poor engine performance and costly repairs.
Water build-up in the tank, often caused by condensation or leaks, is another issue. Water contamination can severely damage your engine and fuel system if left unchecked. Regular cleaning helps prevent these problems and ensures that your vehicle keeps running at its best.
How to Clean a Fuel Tank
Before you begin, gather these tools and materials:
- Gloves and safety glasses: Fuel is flammable and harmful if it comes into contact with your skin or eyes.
- Fuel tank cleaning solution: You can use a commercial cleaner or a DIY mix of vinegar and water (1:1 ratio) to help dissolve contaminants.
- Compressed air or water: To rinse the tank and dry it properly.
- Siphon pump: To safely remove fuel from the tank.
- Fuel filter: To replace if it’s clogged or worn.
- Rust remover: For rusted tanks.
- Rags and towels: For cleaning up fuel and debris.
- Brush or sponge: For scrubbing the interior of the tank.

Step 1: Prioritize Safety
When working with fuel, safety should always come first. Make sure your workspace is well-ventilated and free of open flames. Wear gloves and safety glasses throughout the cleaning process, and be extra cautious to avoid fuel spills. If you’re working indoors, ensure that there’s proper ventilation or better yet, work in an open space.
Step 2: Drain the Fuel Tank
The first thing you'll need to do is drain any remaining fuel from the tank. Use a siphon pump for motorcycles, cars, or other vehicles. For larger vehicles, you may need to use a drain plug or access panel.
Be sure to dispose of the fuel responsibly—never pour it down the drain or into the ground. Many local recycling centers accept used fuel for safe disposal.
Step 3: Remove the Fuel Tank
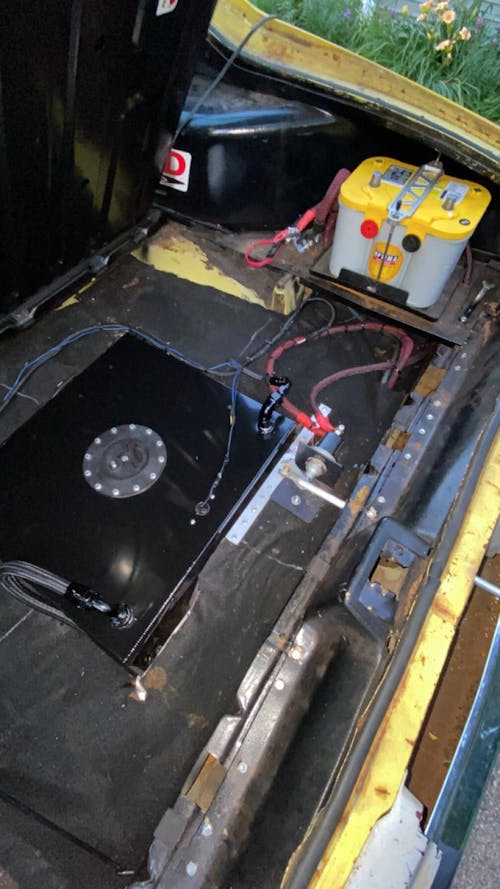
Once the fuel is drained, you'll need to remove the tank from the vehicle. This process will vary depending on the type of vehicle, but typically, you’ll need to disconnect the fuel lines, electrical connections, and bolts that hold the tank in place. Refer to your vehicle’s manual for detailed instructions.
Step 4: Inspect the Fuel Tank
Before cleaning, carefully inspect the tank for visible damage such as cracks, dents, or rust. Rust is common in older tanks and can cause major issues if ignored. If you find rust inside the tank, use a rust remover or cleaner to deal with it. Also, check for fuel leaks—these are a major safety hazard.
If everything looks good, you can move on to cleaning.
Step 5: Clean the Interior of the Tank
The inside of the fuel tank may be covered with sludge, rust, or debris. Here's how to clean it properly:
- Pour the cleaning solution into the tank. You can use a commercial cleaner or make your own by mixing vinegar and water (1:1 ratio) to break down the contaminants.
- Swirl the solution: With the cap securely on, gently shake the tank to help the cleaner reach all areas. Don’t shake too vigorously.
- Scrub the interior: Use a brush or sponge to scrub away any stubborn debris or rust. For heavy rust, try using a piece of chain or a metal object to loosen the particles. Be careful not to scratch the inside of the tank.
- Rinse thoroughly: After cleaning, rinse the tank with water or use compressed air to blow out any leftover solution and debris.
- Dry the tank: Make sure the tank is completely dry using towels or compressed air. It’s crucial that no moisture remains inside before reassembling.
Step 6: Clean or Replace the Fuel Filter
While the tank is off, check the fuel filter. If it’s clogged or worn, it’s a good time to clean or replace it. A dirty or damaged filter can block fuel flow and damage the engine. Replacing the filter ensures your fuel system works at its best.
Related Reading:How to Clean Your Fuel Filter
Step 7: Reassemble the Fuel Tank
Once the tank is clean and dry, and the fuel filter is replaced, reinstall the tank into the vehicle. Reconnect the fuel lines, electrical connectors, and secure the tank with the necessary bolts.
Step 8: Test the Fuel System
Before starting the engine, inspect the fuel lines and connections for leaks. Turn the ignition on and check for any signs of leakage. Also, ensure the fuel pump is working properly. If everything looks good, you’re ready to start the engine.
Common Mistakes to Avoid When Cleaning a Fuel Tank
- Skipping the draining step: Always drain the fuel fully before cleaning. Even small amounts of leftover fuel can cause problems.
- Using the wrong cleaning solution: Stick to safe, mild cleaners like vinegar and water or specific fuel tank cleaners. Harsh chemicals can damage the tank’s lining.
- Overfilling the tank after reinstallation: Be careful not to overfill the tank, as this can cause pressure buildup and fuel leaks.
- Ignoring rust: Rust can cause long-term damage to the tank and fuel system. Make sure to treat it with a rust remover or converter if necessary.
Why You Should Pay Attention to These Overlooked Factors
Many guides focus on removing debris and sludge, but some important details often get missed. These include:
- Water contamination: Water can enter the tank through condensation or leaks, causing corrosion and poor engine performance. Don’t skip removing water during the cleaning process.
- Tank venting: A clogged vent can lead to fuel tank collapse or leakage. Regularly check and clean the vent.
- Fuel system flushing: After cleaning the tank, make sure to flush the fuel lines and injectors to remove any remaining contaminants. This ensures the entire system stays clean.
- Rust treatment: If your tank has rust, it’s essential to use a rust converter, not just a remover, to prevent further corrosion. This step is often overlooked but crucial for long-term care.
When Should You Call a Professional to Clean Your Fuel Tank?
While most car owners can handle cleaning the fuel tank themselves, there are times when it’s best to call a professional. If the tank has severe rust, cracks, or leaks, or if you’re unsure about handling complex components like the fuel pump or injectors, it’s wise to consult a mechanic. A professional can not only clean the tank thoroughly but also seal or line it, which is especially important for high-performance vehicles or large tanks. This step can extend the life of the tank and prevent future issues.
Conclusion
Cleaning your fuel tank is more than just routine maintenance—it’s essential for the longevity and smooth performance of your engine. By following this guide and addressing often-overlooked factors like water contamination, tank venting, and rust treatment, you'll improve your vehicle’s performance and avoid costly repairs.
Taking the time to clean your fuel tank properly and follow through with additional maintenance steps will save you money and hassle in the future. Don’t rush the process—these small, simple steps can make all the difference in keeping your engine running like new.


![EVIL ENERGY 4/6/8/10AN PTFE Fuel Line Kit | E85 Nylon Braided Hose | 16/20FT Black Black with Comprehensive Fittings [20FT]](http://www.ievilenergy.com/cdn/shop/files/Test-2025-Evilenergy-125598065_165x.png?v=1742144807)
![ptfe hose fitting kit [16FT]](http://www.ievilenergy.com/cdn/shop/files/Test-2025-Evilenergy-125598171_165x.png?v=1742144807)
![CPE Fuel Line[25FT]](http://www.ievilenergy.com/cdn/shop/files/25FTCPE_FuelLine_165x.png?v=1735220649)
![CPE Fuel Line[20FT]](http://www.ievilenergy.com/cdn/shop/files/20FTCPE_FuelLine_165x.png?v=1735220649)

